
|
|
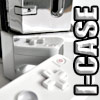
Installation

On the left are the components from inside the Wii and on the right is the case where all this is supposed to fit in. As the I-CASE is identical to the original Wii case in every aspect, this should not pose any problems. Just take the components out and try to remember the order in which you did it. Then reverse the process and put them back in - easy.
Getting the Wii open can be quite difficult for the first timer but fear not - here is the video on how to get the Wii to surrender.

|
From here you can see some of the details of the I-CASE. All the dimension, screw holes, spacers are the same. When one takes the three screws visible on the bottom part and move the items to the top part, it should all go smoothly. Chroming does add some material inside the holes so they may appear to be bit tighter and you may need bit more force to get the screw to sink in. And rest assured, the led visible on the Wii's original power button is also visible with the I-CASE. This so that one can see when the console is on Connect 24 and also to make the covers 100% compatible and identical with the original. |
|

Everything installed and tested to work. No short circuits and games play just fine.
| | Pages: 1 2 3 4 | |
 Content in english!
 Sisältö suomeksi!
