
|
|
Installation

Mounting clip
Coolermaster has "fixed" a problem, which bothered older mounting clips. Before mounting clip was so big that it in some cases reached motherboard's edges and prevented succesfull installation of a whole cooler. Now mounting clip is very small and closer to cooler. This causes a new problem and installation of cooler is very hard. You have to wrench mounting clip quite hard when you are trying to mount it on the socket. Easy solution to the problem is to use brutal force but since Athlon XP's are notoriously easy to break, this kind of wrenching and pressing could be lethal to your precious processor. I hope that Coolermaster redesigns clip so that it is easily installable with a screwdriver.

Bottom

Bottom
Before mounting the cooler on the motherboard is it important to remove the red sticker, which protects bottom of the heatsink from scratches, grease etc. The bottom was very even but left a bit rough. There is no pre-installed thermal compound or pad but Coolermaster bundles big bag of thermal paste with the package.

Speed adjusting
Speed adjusting potentiometer is possible to mount back to PCI slot or in empty 3.5" place. I installed it in an empty PCI slot where it is safe from too enthusiastic rollers.

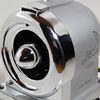
Coolermaster Jet 7

Coolermaster Jet 7
After power is turned on, cooler's interesting look and shining leds look as they are meant to. Glowing red on the back doesn't mean that fan is overheating, it is just red light to mimic jet engine glow. Bright blue led on the front flashes in short intervals just like in real airplanes. Blue led is really bright and illuminates computer case interiors very well.
| | Pages: 1 2 3 4 | |
 Content in english!
 Sisältö suomeksi!
