
|
|

SandpaperAfter re-arranging the disks, the next step is to cut the sand paper. You can use ready ones if they happen to come in right sizes but I decided to cut one of my own. Just a piece of P100 grit paper, a sharp blade and a disk to be used as a template. A bit smoother paper (P600 and up) could possibly eliminate the torgue-problems the tiny motor sometimes has. |

Template and cut sandpaper
At this point you can glue the paper to the disk. This is optional as the centrifugal force and the centre with four screws will keep the paper quite flat anyway. I didn't glue mine.

All done
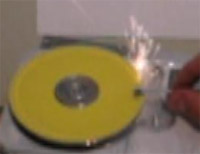
Ready for some testing. All you need to do is to connect the molex connector to the hard disk, start the power supply and watch the plates rev up to the full speed.
In Action

"Special Effects"
 Video |
Watch a video of the HDD Grinder in action. This is the first time when we provide a flash video for online viewing. Hopefully
everything works. WMV version is provided for offline fun. |
Conclusion
HDD Grinder |
Let's see if someone goes even further and seals the whole thing and makes a HDD-wet-sander. Few words for the safety. Spinning things are often more or less dangerous and so is the case with this thing. I suggest you to use gloves, safety glasses and a bit of common sense when using this apparatus. HDDs have only tiny stepper motors, so this thing doesn't have much torgue. Nevertheless it runs fast enought to slit fingertips open and cause nasty cuts. Be careful! |
 Questions or comments? Visit MetkuMods forum.
Past related articles in MetkuMods
|
Mods: - Whisky PC - Project Spire - ShinyShuttle - Epia Sphere |
| | Pages: 1 2 | |
 Content in english!
 Sisältö suomeksi!
 En ota mitään vastuuta tuhoutuneesta tai hajonneesta laitteistosta tai sen osasta.
 Disclaimer! I will not take any responsibility for any destroyed or damaged hardware.
